Contrast OSL (Object-Source Lighting)
Intro
As I got further into painting I tried my hand at OSL, but never really reached a result I was happy with. Eventually I filed it under “Things to do when I get an airbrush” and moved on. But a little while back I figured out a method that achieves good results with very little in the way of required supplies or tools, so here’s a write-up.
Note: I like my OSL very bright. None of that subtle glow stuff, this should make someone think twice before touching the model because they don’t want to get burnt. You can go more subtle by going lighter on the white at the stippling stage though. It also pops a little more on pictures than in real life, but that’s a minor difference.
 |
| French Levant Skimmers |
Supplies and Tools
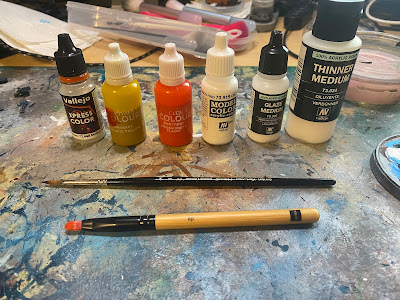
White Acrylic Paint. I like VMC Cold White, but use whatever you like.
Stippling Brush. My favorite is the smallest makeup brush I can find. I’ve tried purpose-made drybrushes from Army Painter and was not impressed.
Glaze Color. Normally some sort of contrast/speedpaint or ink will work best. I’ve put a list of colors I like for this below.
Brush. Whatever you like for applying contrast paint as a glaze, and also for your white touchups. I’ve been using my usual Winsor & Newton Series 7 size 2, but whatever works for you.
(Optional) A second, (synthetic) brush. I think the removal works slightly better with a synthetic brush, maybe the stiffer bristles, but I’m generally too lazy to switch brushes while working.
(Optional) Contrast Medium. Valejo Express Medium also works fine, I wasn’t too happy with Speed Paint 2.0 Medium. This is for getting your glaze color to the right consistency,
(Optional) Acrylic Medium. Painted onto the brightest spots before adding color, it seems to make the removal process slightly easier.
(Optional) Drying Retarder. If you do decide to use this, a little goes a long way. This is mainly if you’re doing a 2 color glaze and want them to blend better, or to aid the removal process. Not especially necessary since the paints are quite transparent already, but maybe it works for you.
(Optional) Glaze Medium. I like adding a little to my white for the final step.
Process
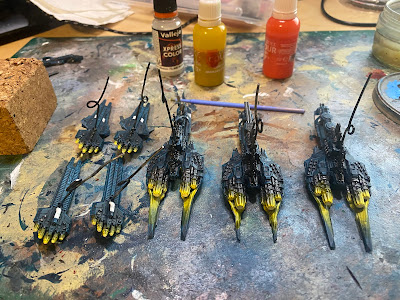
Stipple white paint onto the intended glow area. You want to go lighter the further from the glowing point, and heaviest on the point actually emitting the light. Stabbing your brush towards the imagined light source helps. The less paint you have on your brush and the more gradually you build the gradient, the smoother and better the end result (but I’m lazy and usually do it in 2 passes). This is essentially doing a zenithal highlight/underpainting on a small area of the model.
First pass Second pass
Clean out your stippling brush. I do this immediately after finishing all my stippling.
Paint white onto the brightest glow areas. For recessed areas, I usually thin the white 1:1 with contrast medium and flood the recess.
White on the glow area

Commonwealth Colossi

Enlightened Haunebu Saucer (Optional) Edge highlight with white any areas very close to the light source
Let dry thoroughly. You’re going to be mechanically removing paint, if it isn’t fully dry you might get flecks lifting off. It might also be worth matt varnishing at this point, though I haven’t tried that yet.
Glaze your contrast color of choice over the glow area, going slightly further than your stippled white. You’re aiming for a thin even coat, not flooded as usually the case with contrast. There shouldn’t be any pooling, though it isn’t the end of the world if there is. Keeping your brush loading low is essential here. Depending on the paint, I usually thin it down 2:1 with contrast medium.
Immediately after doing a patch, either rinse off your brush or take your second brush and, after ensuring it is damp, remove the color from the brightest area. The brightest point should be almost white, with gradually increasing color as you move further away. I usually do one batch of color at a time, so that the paint doesn't dry too much. That depends on your atmospheric conditions, however, so find a balance that works for you.
First glow color done
(Optional) After letting the glaze color dry, repeat step 6 and 7 with a second color, leaving a slightly larger area around the original spot of the first color. You might even want to avoid painting the brightest spot in this case.
Second glow color (still wet)
Paint the very center of the brightest area white. Make sure you use a brush with a very fine point for this, depending on the size of the illuminated area. This really makes the end result pop.
 |
| Final white dot |
Colors
Here’s a couple of my standard glow colors
Orange: GWC Ironjawz Yellow & GWC Magmadroth Flame. Ironjawz Yellow is a good consistency, whether you thin it is personal taste. Magmadroth Flame, however, is one of the high pigment contrast colors. I thinned my initial bottle with a heavy dose of contrast medium, and still usually add more before painting with it. Great end result for heat glows.
Radiation Green: GWC Hexwraith Flame. This is fairly thin right out of the bottle, do not thin further. If you want a more sickly yellowish glow, you can do a first layer with ironjawz yellow or mix the two, but I prefer pure Hexwraith Flame.
Blue: GWC Frostheart. I thin this 2:1 with medium. Great for electrical effects or icy glows. If you want an even lighter variant, consider Pylar Glacier instead, it’s the same color but much thinner.
Brush Care
Stippling is really hard on your brush. When I tried it with regular synthetics, it usually killed them in one session. Makeup brushes are made of sterner stuff, but it still pays to take care of your tools. Immediately after the stippling step is done, either set the brush in water or clean it right then. I put some liquid hand soap on the brush and rub the bristles on the palm of my hand to work it in, then rinse under running water while continuing the motion. Eventually the water should run clear of paint and soap bubbles. I then leave the brush to dry, usually taking about a day.
Other Finished Models
 |
| UCM Frigates and Cruisers |
 |
| Commonwealth Colossi |
 |
| Enlightened Haunebu Saucer |
 |
| Prussian Zeppelins |
 |
| Enlightened Support Cruiser and Submarines |
Acknowledgments/Bibliography/References
SlovakCat from the Dystopian Wars discord gave me the initial impetus to figure out this method. They posted some Enlightened with an amazing green glow, but I didn’t have the colors they used, so I tried to figure out an alternative.
The initial concept for removing contrast paint for a brighter glow section came from here. I don’t think using contrast medium is necessary, but the general approach is great. She also recently started working with laying down medium before applying contrast for a smoother result, and this seems to make the removal process work better as well.
https://www.youtube.com/watch?v=LGYWYDv8Gq0
Dana Howl’s How to Underpaint Miniatures. A great initial guide to underpainting, and what initially clued me in to makeup brushes for drybrushing.
There was a video on stippling OSL (blue glow on some sort of tree creature), but I lost that link in the great HDD crash and it never really clicked for me anyway.
Closing
I hope this was useful for you. It's much less effort than it looks to get a good glow, and an airbrush is definitely not necessary. If you have any questions let me know.


Comments
Post a Comment